N81140 Striping
Hello, Bengie. As promised here's the way I'd like to see the Tiger striped (if you'll forgive the pun...). The reason I'm specifying the technique is to let you know how I arrived at the design; feel free to get to the end result any way you see fit.
The design starts by laying out a line parallel to the underside of the tail, 9" from the bottom. This line is to be continued all the way to the front of the airplane. All checkers will be laid out based on this line. Notice that even the nose of the airplane is laid out on this line, carried forward.
This line should be converging with the lower side of the red line as you go forward, but not by much.
The first checker to be laid down is the upper one as shown below. Its bottom should be right on the line you drew above, and it should be placed halfway across the leading edge of the horizontal stab, exclusive of the plastic fillet, when viewed from the end.
The placement of this first checker is critical, as it will determine how far up the vertical stabilizer the retreating checkers go. The goal here is to have the retreating checkers end up about 9" below the red rudder cap, as shown in the subsequent photos. In addition, I like the white space below that first checker, below the stab fillet. I don't want to place a checker right below the stab.
After the first checker is laid down, the next one is lower and forward to the first. It should end up right at the bottom edge of the fuselage (the checkers are 9" tall), maybe slightly wrapping around the bottom (but not much).
Next, you should be doing two things: continuing the alternating checkers forward, and applying the retreating checkers onto the tail.
The retreating checkers should be laid out corner-to-corner, parallel and evenly spaced, until reaching the end of the rudder. At that point please wrap the vinyl slightly around the end of the rudder so paint won't show.
The alternating checkers will maintain their full 9" height on the bottom layer, but the upper layer will be meeting the converging red line. Trim off the top of the upper layer to not over-run the red stripe. Get it as close as you can, but remember that the border between the black and red will be covered with a black stripe tape.
As the forward alternating checkers move over the wing, apply the top edge of the the lower layer of checkers under the straight line and trim the bottom of the checkers to fit (it can bleed over onto the wing if it looks good).
Apply the bottom edge of the upper layer of checkers above the straight line and trim the top to fit.
Note that as you move forward of the wing, do not trim the bottom edge of the lower checkers. Instead, wrap the bottom edge of the lower checkers around the nose to the bottom of the airplane.
Once all of the checkers have been applied, run a 3/8" same-color-black stripe tape along the bottom of the red stripe, covering the area between the red stripe and the checkers.
Apply the N-numbers in the area between the wing and horizontal stab as best as possible. The N-numbers are to be white-on-black vinyl (white numbers with a black outline.) Despite it not being technically legal, I like the design you sent to me earlier. If someone gripes about it, then I can always get different ones from you to replace those (another advantage to vinyl...)
Run a black tape stripe on the inboard edge of the red stripes on the wing and horizontal stabilizer. If you think it will look good, run a smaller black stripe on the bottom edge of the red lines on the wheel pants.
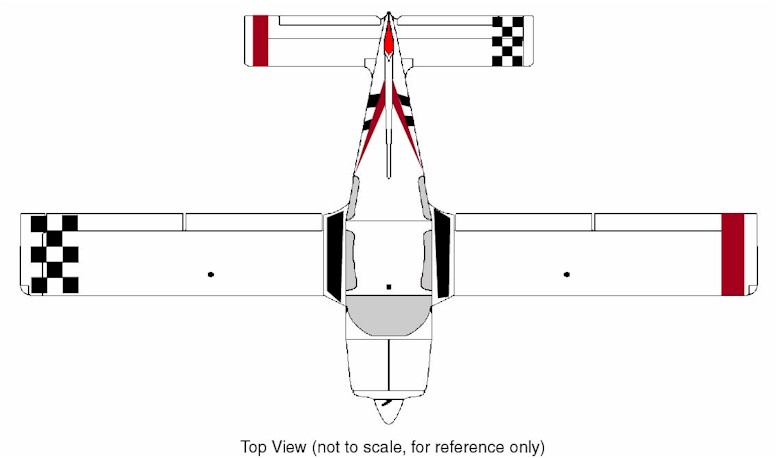
Wing and tail Checkers
The Wing and horizontal stab checkers, as indicated in this photo (http://www.gatm.com/images/Greg/topview.jpg) are not the slanted checkers. The wings are to use 9" squares, and the horizontal stab is to use 6" squares.
On both, measure the distance from the end of the wing/stab of the opposing sides' red stripe. Start the squares at that distance from the end of the wing/stab, right at the trailing edge. Move forward in the checkerboard pattern and wrap the squares around the leading edge of each. Continue the checkerboard design on the underside of the wing//stab until it meets the upper side on the trailing edge. Hopefully, these sizes will make a virtual perfect match at the trailing edge, but if not trim off the excess underneath.
Note that on the wing the checkerboard design will intercept the wingtip landing light. I'd like the light to be visually absorbed into the checker scheme as best as possible.
Fuselage Underside
I don't know what we're going to do on the fuselage underside. Since we didn't trim off the excess vinyl as you worked your way forward of the wing, we have to get a good look at how it worked out. If you have some ideas feel free to experiment, but this might be something we have to experiment with at home.
I don't want to carry the underside design all the way to the tail, only far enough back to pick up those wrapped checkers on the nose and maybe back to mid-wing.
Questions? Call or email me.